0%

Android SystemUI的相关类

在Android系统中SystemUI是以应用的形式运行在Android系统当中,即编译SystemUI模块会生产APK文件,源代码路径在frameworks/base/packages/SystemUI/,安装路径system/priv-app/-SystemUI。它和普通apk不同的是,它是开机启动的并且不可退出,可以把它理解为一个模块。它为系统提供了基础的显示页面,比如 屏幕顶端的状态栏,屏幕底部的导航栏,壁纸,近期使用app列表,截屏操作,电量监控等功能。

状态栏的创建

在Android开机流程的一部分,会调用到ams的systemReady()通知ams已经准备就绪。

以下代码基于android-27,SystemUI每个大版本都有比较大的重构和变化,比如在最新的9.0的master分支中, SERVICE 名单被配置到xml中去了,在看代码的时候千万不能看混了(血泪的代价=。=

1
2
3
4
5
6
7
8
9
10
11
12
13
14
15
16
17
18
19
20
21
22
23
24
25
26
27
28
29
30
31
32
33
34
35
36
37
38
39
40
41
42
43
44
45
46
47
48
49
50
51
52
53
54
55
56
57
58
59
60
61
62
63
64
65
66
67
68
69
70
71
72
73
74
75
76
77
78
79
80
81
82
83
84
85
86
87
88
89
90
91
92
93
94
95
96
97
98
99
100
101
102
103
104
105
106
107
108
109
110
111
112
113
114
115
116
117
118
119
120
121
122
123
124
125
126
127
128
129
130
131
132
133
134
135
136
137
138
139
140
141
142
143
144
145
146
147
148
149
150
151
152
153
154
155
156
157
158
159
160
161
mActivityManagerService.systemReady(() -> {
Slog.i(TAG, "Making services ready");
...
try {
startSystemUi(context, windowManagerF);
} catch (Throwable e) {
reportWtf("starting System UI", e);
}
...
}

static final void startSystemUi(Context context, WindowManagerService windowManager) {
Intent intent = new Intent();
intent.setComponent(new ComponentName("com.android.systemui",
"com.android.systemui.SystemUIService"));
intent.addFlags(Intent.FLAG_DEBUG_TRIAGED_MISSING);
//Slog.d(TAG, "Starting service: " + intent);
context.startServiceAsUser(intent, UserHandle.SYSTEM);
windowManager.onSystemUiStarted();
}

public class SystemUIService extends Service {

@Override
public void onCreate() {
super.onCreate();
((SystemUIApplication) getApplication()).startServicesIfNeeded();
...
}
}

public void startServicesIfNeeded() {
startServicesIfNeeded(SERVICES);
}

private final Class<?>[] SERVICES = new Class[] {
Dependency.class,
NotificationChannels.class,
CommandQueue.CommandQueueStart.class,
KeyguardViewMediator.class,
Recents.class,
VolumeUI.class,
Divider.class,
SystemBars.class,
StorageNotification.class,
PowerUI.class,
RingtonePlayer.class,
KeyboardUI.class,
PipUI.class,
ShortcutKeyDispatcher.class,
VendorServices.class,
GarbageMonitor.Service.class,
LatencyTester.class,
GlobalActionsComponent.class,
};

private void startServicesIfNeeded(Class<?>[] services) {
...
final int N = services.length;
for (int i = 0; i < N; i++) {
Class<?> cl = services[i];
if (DEBUG) Log.d(TAG, "loading: " + cl);
try {
Object newService = SystemUIFactory.getInstance().createInstance(cl);
mServices[i] = (SystemUI) ((newService == null) ? cl.newInstance() : newService);
} catch (IllegalAccessException ex) {
throw new RuntimeException(ex);
} catch (InstantiationException ex) {
throw new RuntimeException(ex);
}

mServices[i].mContext = this;
mServices[i].mComponents = mComponents;
if (DEBUG) Log.d(TAG, "running: " + mServices[i]);
mServices[i].start();

if (mBootCompleted) {
mServices[i].onBootCompleted();
}
}
}

public class SystemBars extends SystemUI {
// in-process fallback implementation, per the product config
private SystemUI mStatusBar;

@Override
public void start() {
createStatusBarFromConfig();
}

private void createStatusBarFromConfig() {
if (DEBUG) Log.d(TAG, "createStatusBarFromConfig");
// R.string.config_statusBarComponent 的值是 com.android.systemui.statusbar.phone.StatusBar
final String clsName = mContext.getString(R.string.config_statusBarComponent);
if (clsName == null || clsName.length() == 0) {
throw andLog("No status bar component configured", null);
}
Class<?> cls = null;
try {
cls = mContext.getClassLoader().loadClass(clsName);
} catch (Throwable t) {
throw andLog("Error loading status bar component: " + clsName, t);
}
try {
mStatusBar = (SystemUI) cls.newInstance();
} catch (Throwable t) {
throw andLog("Error creating status bar component: " + clsName, t);
}
mStatusBar.mContext = mContext;
mStatusBar.mComponents = mComponents;
mStatusBar.start();
if (DEBUG) Log.d(TAG, "started " + mStatusBar.getClass().getSimpleName());
}
}

public class StatusBar extends SystemUI implements ...{
public void start() {
...
mWindowManager = (WindowManager)mContext.getSystemService(Context.WINDOW_SERVICE);
mWindowManagerService = WindowManagerGlobal.getWindowManagerService();
mBarService = IStatusBarService.Stub.asInterface(
ServiceManager.getService(Context.STATUS_BAR_SERVICE));
mCommandQueue = getComponent(CommandQueue.class);
createAndAddWindows();
mBarService.registerStatusBar(mCommandQueue,...);
mCommandQueue.addCallbacks(this);
...
}

public void createAndAddWindows() {
addStatusBarWindow();
}

private void addStatusBarWindow() {
makeStatusBarView();
mStatusBarWindowManager = Dependency.get(StatusBarWindowManager.class);
mRemoteInputController = new RemoteInputController(mHeadsUpManager);
mStatusBarWindowManager.add(mStatusBarWindow, getStatusBarHeight());
}

protected void makeStatusBarView() {
...
boolean showNav = mWindowManagerService.hasNavigationBar();
if (DEBUG) Log.v(TAG, "hasNavigationBar=" + showNav);
if (showNav) {
createNavigationBar();
}
...
}

public int getStatusBarHeight() {
if (mNaturalBarHeight < 0) {
final Resources res = mContext.getResources();
//其中 R.dimen.status_bar_height 的值为 24dp
mNaturalBarHeight =res.getDimensionPixelSize(com.android.internal.R.dimen.status_bar_height);
}
return mNaturalBarHeight;
}
}

上面的过程简化成图就是这样:
SystemUI

值得提到的是,SERVICES里面的那些类,并不是真的Service,它们只是继承了 SystemUI 这个虚基类实现了 onstart()方法而已,可以理解为类似于WindowManager的一个本地服务类(仅仅是为了与wms,ams这些系统服务区分开来),最后在addStatusBarWindow()方法里面创建了window并且把view添加上去完成了状态栏的创建。

在 StatusBar 的 启动过程中,会把 CommandQueue 对象传给 StatusBarManagerService 保存为mBar,类型为bp端,因此当客户端通过 ServiceManager 拿到 StatusBarManagerService 这个系统服务的接口时,就可以通过 mBar 来调用 CommandQueue 对象的方法,而 CommandQueue 则通过callback回调消息给 StatusBar ,这样子就可以更新状态栏了。

状态栏的xml视图

整个View视图:
SystemUI

常规状态栏界面

状态栏1
这个状态栏结构还是挺简单的,由 CollapsedStatusBarFragment 控制, 从左到右依次是 mNotificationIconArea(里面包含mNotificationIcons)用于显示通知图标,mSystemIconArea(好像没有发现有添加图标进去),statusIcons,mSignalClusterView(信号),BatteryMeterView(电池),Clock(时间)

展开状态栏界面

状态栏2收起
状态栏2展开
状态栏2的视图由 QSFragment 控制,有收起和展开状态。其中 QSPannel 区域则重叠了很多视图,包括点击 TileRecord.view 弹出的 mQSDetail,点击 FootImpl的edit按钮弹出的 Edit界面 (mQSCustomizer),以及当前显示出来的界面,在收起状态下为 HeaderTileLayout ,展开状态下为 PagedTileLayout ,这两个View都实现了同一个接口。 其中 PagedTileLayout是一个ViewPager,它的页面是一个自定义View,TilePage。

下面的区域没有细看,应该是 NotificationStackScrollLayout ,用来显示通知详情的

锁屏状态栏界面

发送通知消息的过程

1
2
3
4
5
6
7
8
9
10
11
12
13
14
15
16
17
18
19
20
21
22
23
24
25
26
27
28
29
// NotificationManager:: notify 
public void notify(int id, Notification notification)
{
notify(null, id, notification);
}

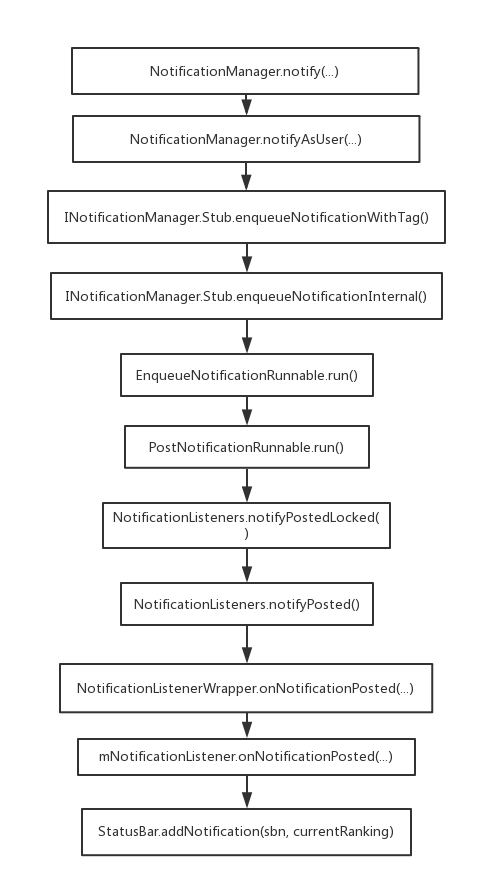
/**
* Post a notification to be shown in the status bar. If a notification with
* the same tag and id has already been posted by your application and has not yet been
* canceled, it will be replaced by the updated information.
*
* @param tag A string identifier for this notification. May be {@code null}.
* @param id An identifier for this notification. The pair (tag, id) must be unique
* within your application.
* @param notification A {@link Notification} object describing what to
* show the user. Must not be null.
*/
public void notify(String tag, int id, Notification notification)
{
notifyAsUser(tag, id, notification, new UserHandle(UserHandle.myUserId()));
}

public void notifyAsUser(String tag, int id, Notification notification, UserHandle user)
{
INotificationManager service = getService();
...
service.enqueueNotificationWithTag(pkg, mContext.getOpPackageName(), tag, id,copy, user.getIdentifier());
...
}

需要注意的是这里的 INotificationManager , NotificationManagerService 并没有直接实现INotificationManager.Stub,而是继承了SystemService,包含了一个INotificationManager.Stub类型的成员变量,并且把它注册到了SystemService中,也就是说 NotificationManagerService 实际上是 INotificationManager.Stub 这个系统服务的管理类,当调用service.enqueueNotificationWithTag(...)的时候,会进入到这个成员变量类的方法里面:

1
2
3
4
5
6
7
8
9
10
11
12
13
14
15
16
17
18
19
20
21
22
23
24
25
26
27
28
29
30
31
32
33
34
35
36
37
38
39
40
41
42
43
44
45
46
47
48
49
50
51
52
53
54
55
56
57
58
59
60
61
62
63
64
65
66
67
68
69
70
71
72
73
74
75
76
77
78
79
80
81
82
83
84
85
//NotificationManagerService::mService::enqueueNotificationWithTag()

public void enqueueNotificationWithTag(String pkg, String opPkg, String tag, int id,
Notification notification, int userId) throws RemoteException {
enqueueNotificationInternal(pkg, opPkg, Binder.getCallingUid(),
Binder.getCallingPid(), tag, id, notification, userId);
}

void enqueueNotificationInternal(final String pkg, final String opPkg, final int callingUid,
final int callingPid, final String tag, final int id, final Notification notification,
int incomingUserId) {
... // 权限,pid,重复 等检查
mHandler.post(new EnqueueNotificationRunnable(userId, r));
}

protected class EnqueueNotificationRunnable implements Runnable {
...
@Override
public void run() {
synchronized (mNotificationLock) {
...
// tell the assistant service about the notification
if (mAssistants.isEnabled()) {
mAssistants.onNotificationEnqueued(r);
mHandler.postDelayed(new PostNotificationRunnable(r.getKey()),
DELAY_FOR_ASSISTANT_TIME);
} else {
mHandler.post(new PostNotificationRunnable(r.getKey()));
}
}
}
}
}

protected class PostNotificationRunnable implements Runnable {
...
@Override
public void run() {
synchronized (mNotificationLock) {
...
NotificationRecord old = mNotificationsByKey.get(key);
final StatusBarNotification n = r.sbn;
final Notification notification = n.getNotification();
int index = indexOfNotificationLocked(n.getKey());
if (index < 0) {
mNotificationList.add(r);
mUsageStats.registerPostedByApp(r);
} else {
old = mNotificationList.get(index);
mNotificationList.set(index, r);
mUsageStats.registerUpdatedByApp(r, old);
// Make sure we don't lose the foreground service state.
notification.flags |=
old.getNotification().flags & Notification.FLAG_FOREGROUND_SERVICE;
r.isUpdate = true;
}

mNotificationsByKey.put(n.getKey(), r);

// Ensure if this is a foreground service that the proper additional
// flags are set.
if ((notification.flags & Notification.FLAG_FOREGROUND_SERVICE) != 0) {
notification.flags |= Notification.FLAG_ONGOING_EVENT
| Notification.FLAG_NO_CLEAR;
}

applyZenModeLocked(r);
mRankingHelper.sort(mNotificationList);
if (notification.getSmallIcon() != null) {
StatusBarNotification oldSbn = (old != null) ? old.sbn : null;
mListeners.notifyPostedLocked(n, oldSbn);
if (oldSbn == null || !Objects.equals(oldSbn.getGroup(), n.getGroup())) {
mHandler.post(new Runnable() {
@Override
public void run() {
mGroupHelper.onNotificationPosted(
n, hasAutoGroupSummaryLocked(n));
}
});
}
}
...
}
}
}

这一路的Runnable跟下去,发现到最后只是添加通知到mNotificationList并排序,我们知道通知最后是会在状态栏显示一个图标的,从前面的分析和之前版本的Android源码来看,拿到 StatusBarManagerService 就可以更新状态栏,但找来找去没有发现 StatusBarManagerService 的踪影,最后,注意到 mListeners.notifyPostedLocked(n, oldSbn);, 发现mListener类型为NotificationListeners,接下来跟下去:

1
2
3
4
5
6
7
8
9
10
11
12
13
14
15
16
17
18
19
20
21
22
23
public class NotificationListeners extends ManagedServices {
public void notifyPostedLocked(StatusBarNotification sbn, StatusBarNotification oldSbn) {
for (final ManagedServiceInfo info : getServices()) {
mHandler.post(new Runnable() {
@Override
public void run() {
notifyPosted(info, sbnToPost, update);
}
});
}
}

private void notifyPosted(final ManagedServiceInfo info,
final StatusBarNotification sbn, NotificationRankingUpdate rankingUpdate) {
final INotificationListener listener = (INotificationListener) info.service;
StatusBarNotificationHolder sbnHolder = new StatusBarNotificationHolder(sbn);
try {
listener.onNotificationPosted(sbnHolder, rankingUpdate);
} catch (RemoteException ex) {
Log.e(TAG, "unable to notify listener (posted): " + listener, ex);
}
}
}

这里又出来一个listener,是从ManagedServices.getServices()得到的, 在 ManagedServices 类中搜索,发现 mServices.add() 调用有多处,但都是从 registerService(…) 开始,于是在 NotificationManagerService 中搜索 ManagedServices类型的成员变量mListeners的registerService()方法,发现调用是在 INotificationManager.Stub.registerListener() 方法中:

1
2
3
4
5
6
7
8
9
10
11
12
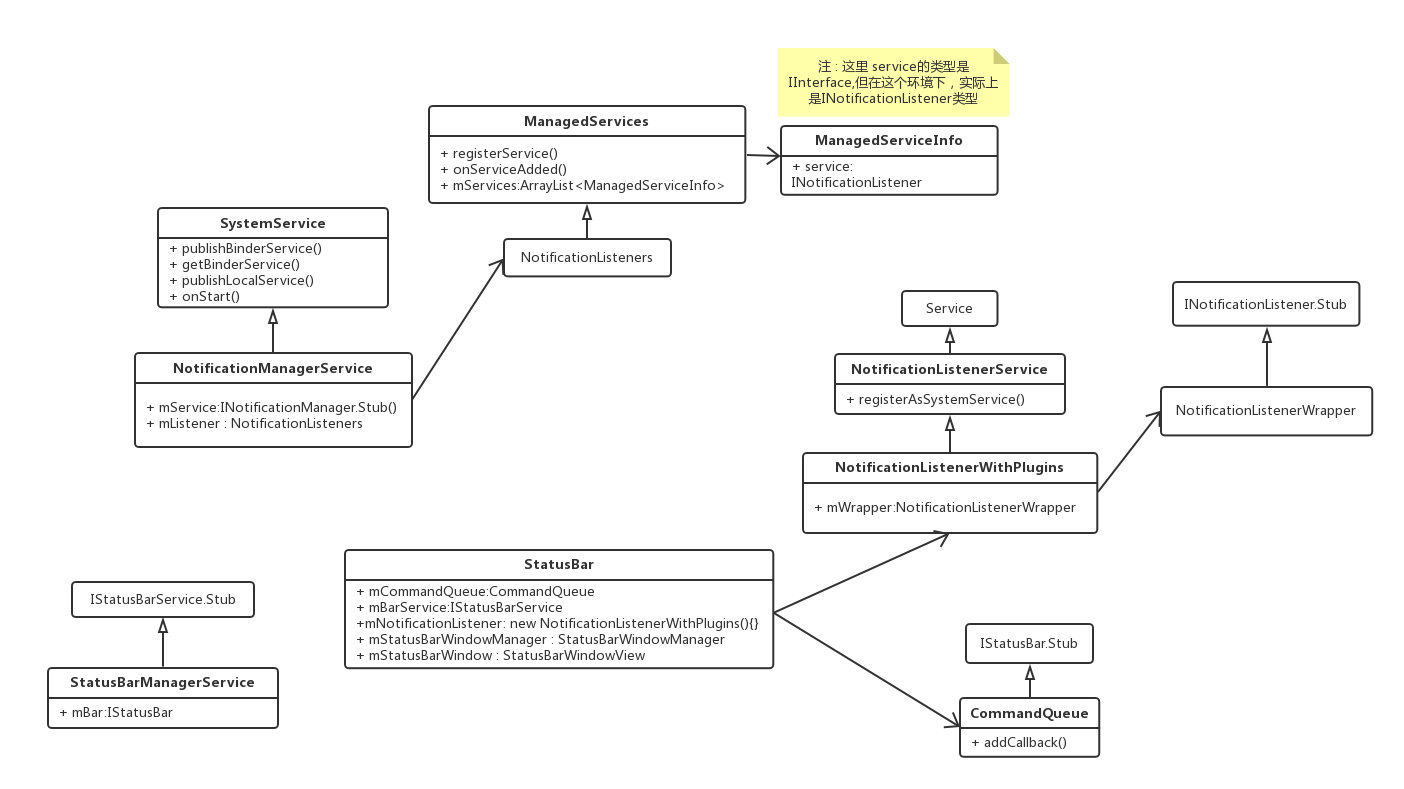
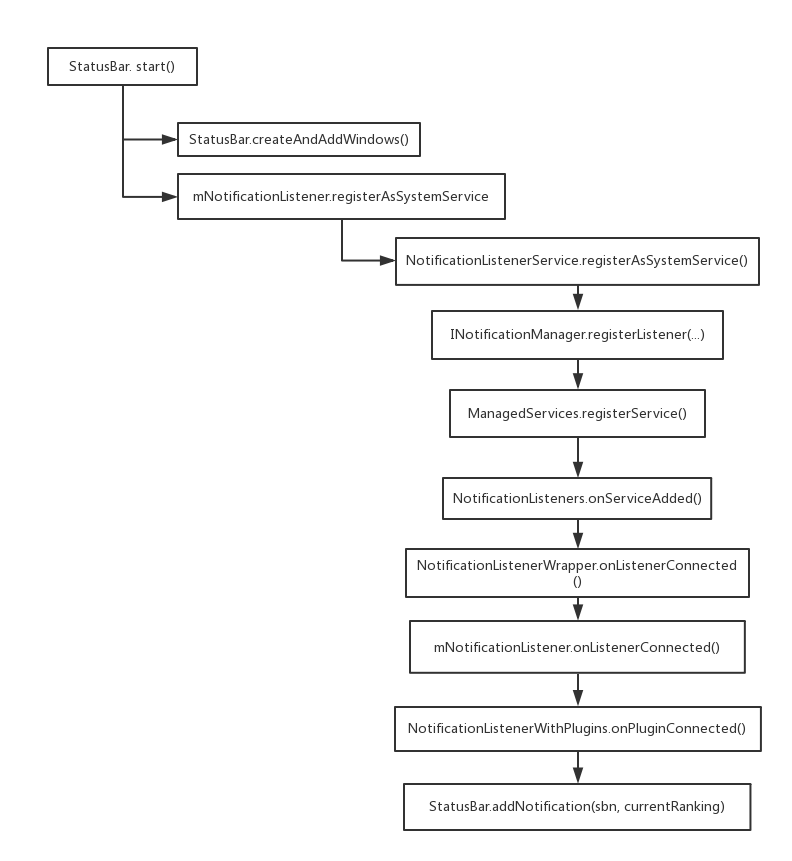
/**
* Register a listener binder directly with the notification manager.
*
* Only works with system callers. Apps should extend
* {@link android.service.notification.NotificationListenerService}.
*/
@Override
public void registerListener(final INotificationListener listener,
final ComponentName component, final int userid) {
enforceSystemOrSystemUI("INotificationManager.registerListener");
mListeners.registerService(listener, component, userid);
}

这里提到 这个方法仅仅供系统直接调用,app应该通过继承 NotificationListenerService 来调用,那么去看 NotificationListenerService 这个类,发现它的registerAsSystemService()方法中刚好调用了INotificationManager.registerListener(),而它传过去的第一个参数是 NotificationListenerWrapper类型的实例mWrapper,也就是上面所找的 INotificationListener listener,原来 listener 的赋值是在这里。那么接着上面的通知发送流程,也就是listener.onNotificationPosted(...),我们看向 mWrapper 的 onNotificationPosted() 方法,发现最终调用到 NotificationListenerService.onNotificationPosted(…) ,而这个方法是空方法…

这个线索断了,我们继续回过头来找 NotificationListenerService.registerAsSystemService()的调用方法,右键 find usages 发现调用回到了 StatusBar.onStart()方法,这才发现 StatusBar有个成员变量 mNotificationListener ,类型为继承了 NotificationListenerService 类的 NotificationListenerWithPlugins类:

1
2
3
4
5
6
7
8
9
10
11
12
13
14
15
16
17
18
19
20
21
22
23
24
25
//StatusBar::Start
public void start() {
...
try {
mNotificationListener.registerAsSystemService(...);
} catch (RemoteException e) {
Log.e(TAG, "Unable to register notification listener", e);
}
...
}

public class NotificationListenerWithPlugins extends NotificationListenerService implements
PluginListener<NotificationListenerController> {

private ArrayList<NotificationListenerController> mPlugins = new ArrayList<>();
private boolean mConnected;

@Override
public void registerAsSystemService(Context context, ComponentName componentName,
int currentUser) throws RemoteException {
super.registerAsSystemService(context, componentName, currentUser);
Dependency.get(PluginManager.class).addPluginListener(this,
NotificationListenerController.class);
}
}

这里看到 registerAsSystemService() 除了调用父类的方法外,还调用了 addPluginListener() ,这里 addPluginListener() 先不看,从名字上看可能是 把notification的更新通知给所有的插件 。上面我们提到listener.onNotificationPosted(...)最终调用到了一个空方法,但是这里既然有了子类,那么就会调用到子类的 onNotificationPosted() 方法中:

1
2
3
4
5
6
7
8
9
10
11
12
13
14
15
16
17
18
19
20
21
22
23
24
25
26
27
28
29
30
31
32
33
34
35
36
37
38
39
40
41
42
43
44
45
46
47
48
49
50
51
52
53
54
55
56
57
58
59
60
61
62
63
64
65
66
67
68
69
70
71
72
73
74
75
76
77
78
79
80
81
82
83
84
85
86
87
88
89
90
private final NotificationListenerWithPlugins mNotificationListener =
new NotificationListenerWithPlugins() {
@Override
public void onListenerConnected() {
if (DEBUG) Log.d(TAG, "onListenerConnected");
onPluginConnected();
final StatusBarNotification[] notifications = getActiveNotifications();
if (notifications == null) {
Log.w(TAG, "onListenerConnected unable to get active notifications.");
return;
}
final RankingMap currentRanking = getCurrentRanking();
mHandler.post(new Runnable() {
@Override
public void run() {
for (StatusBarNotification sbn : notifications) {
try {
addNotification(sbn, currentRanking);
} catch (InflationException e) {
handleInflationException(sbn, e);
}
}
}
});
}

@Override
public void onNotificationPosted(final StatusBarNotification sbn,
final RankingMap rankingMap) {
if (DEBUG) Log.d(TAG, "onNotificationPosted: " + sbn);
if (sbn != null && !onPluginNotificationPosted(sbn, rankingMap)) {
mHandler.post(new Runnable() {
@Override
public void run() {
processForRemoteInput(sbn.getNotification());
String key = sbn.getKey();
mKeysKeptForRemoteInput.remove(key);
boolean isUpdate = mNotificationData.get(key) != null;
// In case we don't allow child notifications, we ignore children of
// notifications that have a summary, since we're not going to show them
// anyway. This is true also when the summary is canceled,
// because children are automatically canceled by NoMan in that case.
if (!ENABLE_CHILD_NOTIFICATIONS
&& mGroupManager.isChildInGroupWithSummary(sbn)) {
if (DEBUG) {
Log.d(TAG, "Ignoring group child due to existing summary: " + sbn);
}

// Remove existing notification to avoid stale data.
if (isUpdate) {
removeNotification(key, rankingMap);
} else {
mNotificationData.updateRanking(rankingMap);
}
return;
}
try {
if (isUpdate) {
updateNotification(sbn, rankingMap);
} else {
addNotification(sbn, rankingMap);
}
} catch (InflationException e) {
handleInflationException(sbn, e);
}
}
});
}
}

@Override
public void onNotificationRemoved(StatusBarNotification sbn,
final RankingMap rankingMap) {
if (DEBUG) Log.d(TAG, "onNotificationRemoved: " + sbn);
if (sbn != null && !onPluginNotificationRemoved(sbn, rankingMap)) {
final String key = sbn.getKey();
mHandler.post(() -> removeNotification(key, rankingMap));
}
}

@Override
public void onNotificationRankingUpdate(final RankingMap rankingMap) {
if (DEBUG) Log.d(TAG, "onRankingUpdate");
if (rankingMap != null) {
RankingMap r = onPluginRankingUpdate(rankingMap);
mHandler.post(() -> updateNotificationRanking(r));
}
}

};

这里终于看到了addNotification(sbn, rankingMap)的调用了。。。总结一下:
类图 :
StatusBar类图

通知相关初始化 :

通知相关初始化

发送通知的过程 :

通知过程

在Android 8.0里面不仅状态栏的界面和交互发生了变化,连消息流向也变了。之前是直接查询SystemServer就可以拿到StatusBarManagerService,然后可以通知StatusBar去 addNotification() ,现在的版本则不再通过 StatusBarManagerService ,而是使用 NotificationListenerService 去创建一个内部类INotificationListener.Stub类型的成员变量并注册它到 NotificationManager Service,这样子 NotificationManager 就拿到了远程接口可以直接调用到内部类中,再调用到 NotificationListenerService 类中,而客户端通过 继承NotificationListenerService的子类,就等于可以直接接收到NotificationManagerService的回调。这里有个问题,为什么不像 mCommandQueue 一样直接把 INotificationListener.Stub 传给 NotificationListenerService 呢 ?在这里猜想是因为plug相关的操作,通知消息不仅仅要告诉StatusBar,也需要告诉一些plug,因此拿 NotificationListenerService 来进行adapt和管理。

在类图中,我们可以清晰的看到, StatusBarManagerService 比较直接, 它可以通过 IStatusBar 直接调用到 CommandQueue ,而 CommandQueue 则通过callback通知到 StatusBar 。而 NotificationManagerService 则是另外一种方法,它可以一路找到 INotificationListener,然后调用到 INotificationListener.Stub 所在的 StatusBar 类,这里是通过匿名内部类的机制直接调用到 StatusBar的方法。 不管是哪种方式,我们都可以大致的总结出一种 客户端 和 系统服务交互的简化模型,即

系统服务 <===> binder接口管理类 <==> 客户端

对于 StatusBarManagerService 来说,就是 StatusBarManagerService <===> CommandQueue <==> StatusBar,对于 NotificationManagerService 来说,就是 NotificationManagerService <===> NotificationListenerWithPlugins <==> StatusBar,在更多的功能模块中,我们也会看到这种模型,比如 wms <===> ViewRootImpl(包含mWindow) <==> PhoneWindow 等。

在 SystemService 的注释中我们也可以看到,以后Android会逐步转成这种方式,即 系统服务 都会继承 SystemService 类,SystemService类则定义了通用的一些回调方法。系统服务中则以Ixxx.Stub这种真正的服务作为成员变量,这么做的好处在于,可以把系统服务之间需要相互调用的方法剥离出来成一个内部类,叫做 xxxxInternal.class , 然后在 SystemService 类中会保存一个静态的hashmap,用来存储这种对应关系。因为系统服务大部分都是运行在同一个系统进程的不同线程,所以这个hashmap会对所有的系统服务可见,当 StatusBarManagerService 需要 NotificationManagerService 的功能的时候,就不需要通过binder调用来进行了,而是直接可以从 hashmap 取出 xxxxInternal 类,进而调用到 NotificationManagerService 的功能中去,提高了一些效率。

导航栏

导航栏的添加和状态栏的添加在一起:

1
2
3
4
5
6
7
8
9
10
11
12
13
14
15
16
17
18
19
20
21
22
23
24
25
26
27
28
29
30
31
32
33
34
35
36
37
38
39
40
41
protected void makeStatusBarView() {
...
createNavigationBar();
...
}

protected void createNavigationBar() {
mNavigationBarView = NavigationBarFragment.create(...);
}

//NavigationBarFragment::create(...)
public static View create(Context context, FragmentListener listener) {
WindowManager.LayoutParams lp = new WindowManager.LayoutParams(
LayoutParams.MATCH_PARENT, LayoutParams.MATCH_PARENT,
WindowManager.LayoutParams.TYPE_NAVIGATION_BAR,
WindowManager.LayoutParams.FLAG_TOUCHABLE_WHEN_WAKING
| WindowManager.LayoutParams.FLAG_NOT_FOCUSABLE
| WindowManager.LayoutParams.FLAG_NOT_TOUCH_MODAL
| WindowManager.LayoutParams.FLAG_WATCH_OUTSIDE_TOUCH
| WindowManager.LayoutParams.FLAG_SPLIT_TOUCH
| WindowManager.LayoutParams.FLAG_SLIPPERY,
PixelFormat.TRANSLUCENT);
lp.token = new Binder();
lp.setTitle("NavigationBar");
lp.windowAnimations = 0;

View navigationBarView = LayoutInflater.from(context).inflate(
R.layout.navigation_bar_window, null);

if (DEBUG) Log.v(TAG, "addNavigationBar: about to add " + navigationBarView);
if (navigationBarView == null) return null;

context.getSystemService(WindowManager.class).addView(navigationBarView, lp);
FragmentHostManager fragmentHost = FragmentHostManager.get(navigationBarView);
NavigationBarFragment fragment = new NavigationBarFragment();
fragmentHost.getFragmentManager().beginTransaction()
.replace(R.id.navigation_bar_frame, fragment, TAG)
.commit();
fragmentHost.addTagListener(TAG, listener);
return navigationBarView;
}

这里 导航栏的window参数为LayoutParams.MATCH_PARENT,从之前 wms 的介绍可以知道, 在relayoutWindow()的时候,window的尺寸和位置最终都以 wms 的决定为准,而在 wms的 addWindow/在relayoutWindow 方法中,都可以看到 updateFocusedWindowLocked()的调用:

1
2
3
4
5
6
7
8
9
10
11
12
13
14
15
16
17
18
19
20
21
22
23
24
25
26
27
28
29
30
31
32
33
34
35
36
37
38
39
40
41
42
43
44
45
46
47
48
49
50
51
52
53
54
55
56
57
58
59
60
61
62
63
64
65
66
67
68
69
70
71
72
73
74
75
76
77
78
79
80
81
82
83
84
85
86
// wms ::updateFocusedWindowLocked()
boolean updateFocusedWindowLocked(int mode, boolean updateInputWindows) {
...
displayContent.performLayout(...);
...
}

//DisplayContent::performLayout()
void performLayout(boolean initial, boolean updateInputWindows) {
...
mService.mPolicy.beginLayoutLw(isDefaultDisplay, dw, dh, mRotation,getConfiguration().uiMode);
...
}

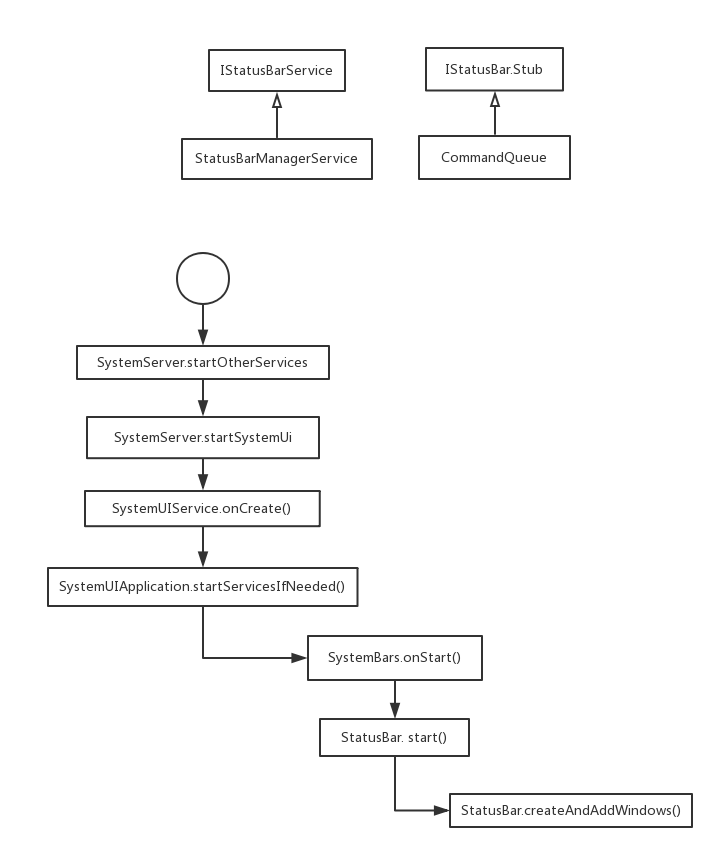
//PhoneWindowManager::beginLayoutLw()
public void beginLayoutLw(boolean isDefaultDisplay, int displayWidth, int displayHeight,
int displayRotation, int uiMode) {
...
if (isDefaultDisplay) {
// For purposes of putting out fake window up to steal focus, we will
// drive nav being hidden only by whether it is requested.
final int sysui = mLastSystemUiFlags;
boolean navVisible = (sysui & View.SYSTEM_UI_FLAG_HIDE_NAVIGATION) == 0;
boolean navTranslucent = (sysui
& (View.NAVIGATION_BAR_TRANSLUCENT | View.NAVIGATION_BAR_TRANSPARENT)) != 0;
boolean immersive = (sysui & View.SYSTEM_UI_FLAG_IMMERSIVE) != 0;
boolean immersiveSticky = (sysui & View.SYSTEM_UI_FLAG_IMMERSIVE_STICKY) != 0;
boolean navAllowedHidden = immersive || immersiveSticky;
navTranslucent &= !immersiveSticky; // transient trumps translucent
boolean isKeyguardShowing = isStatusBarKeyguard() && !mKeyguardOccluded;
if (!isKeyguardShowing) {
navTranslucent &= areTranslucentBarsAllowed();
}
boolean statusBarExpandedNotKeyguard = !isKeyguardShowing && mStatusBar != null
&& mStatusBar.getAttrs().height == MATCH_PARENT
&& mStatusBar.getAttrs().width == MATCH_PARENT;

// When the navigation bar isn't visible, we put up a fake
// input window to catch all touch events. This way we can
// detect when the user presses anywhere to bring back the nav
// bar and ensure the application doesn't see the event.
if (navVisible || navAllowedHidden) {
if (mInputConsumer != null) {
mHandler.sendMessage(
mHandler.obtainMessage(MSG_DISPOSE_INPUT_CONSUMER, mInputConsumer));
mInputConsumer = null;
}
} else if (mInputConsumer == null) {
mInputConsumer = mWindowManagerFuncs.createInputConsumer(mHandler.getLooper(),
INPUT_CONSUMER_NAVIGATION,
(channel, looper) -> new HideNavInputEventReceiver(channel, looper));
// As long as mInputConsumer is active, hover events are not dispatched to the app
// and the pointer icon is likely to become stale. Hide it to avoid confusion.
InputManager.getInstance().setPointerIconType(PointerIcon.TYPE_NULL);
}

// For purposes of positioning and showing the nav bar, if we have
// decided that it can't be hidden (because of the screen aspect ratio),
// then take that into account.
navVisible |= !canHideNavigationBar();

boolean updateSysUiVisibility = layoutNavigationBar(displayWidth, displayHeight,
displayRotation, uiMode, overscanLeft, overscanRight, overscanBottom, dcf, navVisible, navTranslucent,
navAllowedHidden, statusBarExpandedNotKeyguard);
if (DEBUG_LAYOUT) Slog.i(TAG, String.format("mDock rect: (%d,%d - %d,%d)",
mDockLeft, mDockTop, mDockRight, mDockBottom));
updateSysUiVisibility |= layoutStatusBar(pf, df, of, vf, dcf, sysui, isKeyguardShowing);
if (updateSysUiVisibility) {
updateSystemUiVisibilityLw();
}
}
}

private boolean layoutNavigationBar(...) {
...
getNavigationBarHeight()/getNavigationBarWidth()
...
}

private int getNavigationBarHeight(int rotation, int uiMode) {
if (ALTERNATE_CAR_MODE_NAV_SIZE && (uiMode & UI_MODE_TYPE_MASK) == UI_MODE_TYPE_CAR) {
return mNavigationBarHeightForRotationInCarMode[rotation];
} else {
return mNavigationBarHeightForRotationDefault[rotation];
}
}

在 PhoneWindowManager 类中可以看到这个值的默认值是 res.getDimensionPixelSize(com.android.internal.R.dimen.navigation_bar_height) : 48dp

布局

导航栏的布局比较简单:

1
@layout/navigation_bar_window  --> @layout/navigation_bar --> NavigationBarInflaterView|@layout/navigation_layout

其中,每一个按钮是一个 KeyButtonView,继承了ImageView 并且定义了 KeyButtonRipple 用来显示按下效果。在onTouchEvent()里面里,对于home,back等有keycode的控件,会根据keycode,生成一个KeyEvent(),插入到inputManager去分发,这样客户端就可以收到事件了。对于recent等没有keycode的控件会直接触发onclickListener。